
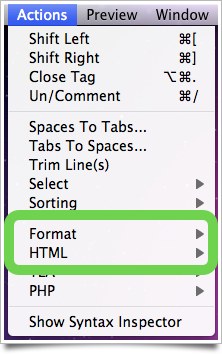
HTML Actions
 Although all of the following actions were designed for HTML, TEA also supports multiple syntaxes allowing several of them to be useful in other markup languages, as well.
Since many of these actions were inspired by Textmate, they typically use the same keyboard shortcuts as their Textmate equivalents with some minor variation.
Formatting actions
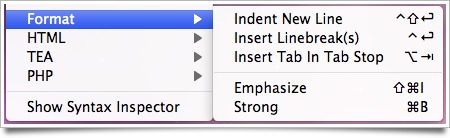
Indent New Line (control-shift-enter)
One of my favorite parts of Textmate was that after creating an HTML tag, I only had to hit enter once to get a perfectly indented tag pair with the cursor in between and bumped in a level. The fact that Espresso doesn’t do this irks me greatly, and so this action allows you to force the issue. Indent New Line will turn this (pipe represents cursor):
<div>|</div>
Into this:
<div>
    |
</div>
If you have any text selected when you run the action, the selected text will be moved to the middle line and indented.
Insert Linebreak(s) (control-enter)
In HTML, Insert Linebreak(s) will insert a break tag (<br />). In some other contexts (like PHP double quoted strings), it will insert \n. In Markdown it will insert two spaces and a linebreak. If you have one or more selections, the HTML tag or textual linebreak will be inserted at the end of each selection.
In case you didn’t quite catch that, Espresso allows you to have multiple selections (hold down command while you select multiple items with your mouse), and this action will affect all of them. This is extremely cool, and one of the features that I’m still learning to use; before now, I’d never come across a text editor that allowed me to so much as select multiple items at once.
Insert Tab In Tab Stop (option-tab)
Many snippets in Espresso provide tab stops, allowing you to jump through the various parts of the snippet you might want to customize by hitting tab. However, sometimes when you are inside a snippet with tab stops you may want to insert a literal tab without losing your place. You can do so with this action.
Strong (command-B) and Emphasize (command-shift-I)
These do about what you’d expect. If you have one or more selections, they’re surrounded with <strong> or <em> tags. If no selection, you get a tag wrapping your cursor. Incidentally, if you’re working with a single selection (or no selection) you’ll get a text snippet with tab stops, so hit the tab key to edit what’s inside the tag.
A note on Emphasize’s shortcut; command-I by default is used to show and hide the navigator sidebar, hence this somewhat odd shortcut for italics. If you wish to switch the shortcuts, you can do so through the System Preferences Keyboard preference pane.
HTML actions
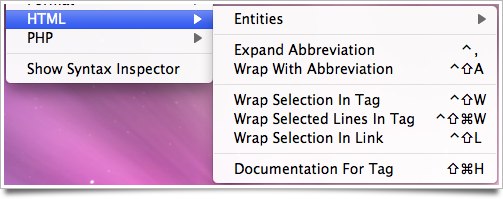
Entities → Convert To Named Entities (control-&) and Entities → Convert To Numeric Entities
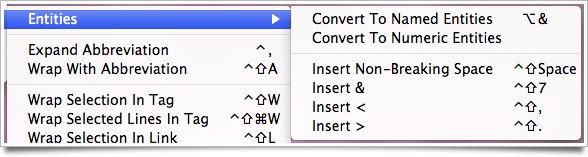
Run one of these actions to have the character immediately to the left of the cursor converted from Unicode into an HTML character entity. If you have one or more selections, all non-ASCII Unicode characters will be converted to entities of the desired variety. If using named entities, Unicode characters without a named entity will still be converted to their numeric equivalent. These actions will also convert ampersands (but will ignore ampersands that are already part of an entity).
Entities → Insert Non-Breaking Space, etc.
Use these actions to quickly insert the named HTML entity for the given character:
:control-shift-space&:control-shift-7<:control-shift-,(control-shift-comma)>:control-shift-.(control-shift-period)
Expand Abbreviation (control-,)
This is the access point for the magic of zen coding, so get this shortcut under your fingers! Typically, you’ll use zen coding’s CSS selectors to apply IDs and classes to your markup. Type this:
div#stuff.things.booyah
And after running Expand Abbreviation you’ll get this (pipe represents cursor):
<div id="stuff" class="things booyah">|</div>
Zen coding also supports numerous other CSS-inspired shortcuts for creating markup. Take this for instance:
div#nav+div#content>p.item$*2
Which leads to this (fully tab-stopped!):
<div id="nav">|</div>
<div id="content">
    <p class="item1"></p>
    <p class="item2"></p>
</div>
For tags that always have children, you can often get an expanded version of them using a trailing plus sign:
ul+
Leads to:
<ul>
    <li>|</li>
</ul>
And that’s just the tip of the iceberg. Zen coding offers numerous other selectors and scads of abbreviations for HTML and CSS. All of them will work with Expand Abbreviation.
You may also, if you need, use the old Textmate-style tag creation where you type out everything in the tag except the carets, highlight it, and run it through Expand Abbreviation to get a full tag. For instance, this:
div style="width:100%;"
Once selected and run through Expand Abbreviation leads to this markup:
<div style="width:100%;">|</div>
If there is no selection, Expand Abbreviation will use the current word regardless of where the cursor falls in it (Textmate will only parse to the left of the cursor).
Wrap With Abbreviation (control-shift-A)
Wrap With Abbreviation allows you to apply zen coding abbreviations to a selection. Your selected text will be put inside the last element in whatever abbreviation you enter or, if you don’t have a selection, it will try to run the HTML tag balancing algorithm and wrap the deepest nested tag’s contents.
You can also wrap multiple lines by selecting them and constructing an abbreviation with a multiplication operator, simply skipping the number that usually follows. So if you wanted to wrap several lines of text in list items and links, you could do this:
ul>li*>a
So for example, if you selected this:
Home
About
Contact
And ran it through the abbreviation above with Wrap With Abbreviation, you would end up with this:
<ul>
    <li><a href="">Home</a></li>
    <li><a href="">About</a></li>
    <li><a href="">Contact</a></li>
</ul>
Wrap Selection In Tag (control-shift-W)
As you might expect, if you select some text and invoke Wrap Selection In Tag, the selection will be wrapped in an HTML tag. Just like in Textmate, you can type out tag attributes and they won’t be mirrored to the closing tag, and moving outside the tag is a tab away.
Wrap Selected Lines In Tag (command-control-shift-W)
This one acts just like Wrap Selection In Tag, except that each line in the selection is wrapped.
Wrap Selection In Link (control-shift-L)
Unsurprisingly, selecting some text and invoking this command will wrap it in an HTML link tag. What makes this action more worthwhile than some of the others is that if you have a recognizable link on your clipboard it will be inserted, and there are several tab stops set up to make removing or editing the link’s title extremely easy. Unlike Textmate, this action does not attempt to populate the title from the actual webpage’s title. I’ve had Textmate hang while it waits to retrieve the webpage too many times to want to implement that functionality myself.
If you use this action while editing Markdown or Textile, the selection will be wrapped in a Markdown or Textile link rather than an HTML anchor.
Documentation For Tag (command-shift-H)
If your cursor is inside an HTML tag, you can run Documentation For Tag to have the word under the cursor (or the selection) searched for in HTMLHelp.com’s HTML reference. If the cursor is inside an HTML tag, you’ll be taken straight to the first result (almost always the correct tag page). Otherwise, you’ll get a Google result listing.


